
Table of Contents
- Why Commercial Cleaning Quality Assurance Matters
- Building Your Commercial Cleaning Inspection Checklist
- Creating a Cleaning Inspection Form Template
- Conducting a Commercial Cleaning Walkthrough Checklist
- Implementing a Janitorial Quality Control Checklist
- Common Mistakes to Avoid in Quality Assurance
- Frequently Asked Questions
Last Updated: October 10, 2026
Why Commercial Cleaning Quality Assurance Matters
A commercial cleaning quality assurance checklist isn’t just a nice-to-have, it’s the foundation of consistent service delivery. Without one, cleaning standards drift. Staff miss critical tasks. Clients notice. Your reputation suffers.
A structured quality assurance checklist turns subjective “looks clean” into measurable, repeatable standards, preventing complaints, turnover, and escalating costs.
This guide teaches you how to create inspection forms, conduct walkthroughs, score results, and track corrective actions, building a system that ensures every cleaning task meets client requirements consistently.
Building Your Commercial Cleaning Inspection Checklist
A solid commercial cleaning inspection checklist organizes tasks by area and frequency, daily, weekly, and deep cleaning, keeping your team focused and ensuring nothing gets skipped.
Daily Cleaning Tasks by Area
Reception and Entryway Cleaning
Your daily checklist should include: vacuuming entry mats, wiping door handles and push plates, cleaning glass doors and windows, emptying trash, and spot-cleaning visible surfaces.
Office and Workplace Cleaning
Daily tasks include disinfecting desk surfaces and keyboards, wiping door handles, vacuuming or sweeping floors, emptying trash and recycling, and spot-cleaning stains.
Restroom Cleaning and Disinfection
Daily tasks include disinfecting toilets, sinks, and faucets, wiping mirrors and light switches, mopping floors, restocking supplies, and emptying trash.
Breakroom and Kitchen Cleaning
Daily tasks include wiping countertops and appliances, disinfecting the sink, sweeping and mopping floors, emptying trash, and spot-cleaning spills.
Weekly and Deep Cleaning Tasks
Weekly tasks include dusting surfaces and baseboards, mopping hard floors, vacuuming under furniture, and cleaning windows. Deep cleaning tasks like carpet shampooing, floor stripping, and appliance cleaning happen monthly or quarterly depending on facility type and client requirements.
Organize your weekly checklist by room or area, not by task type. This helps your cleaning staff move efficiently through the facility instead of jumping between locations.
Creating a Cleaning Inspection Form Template
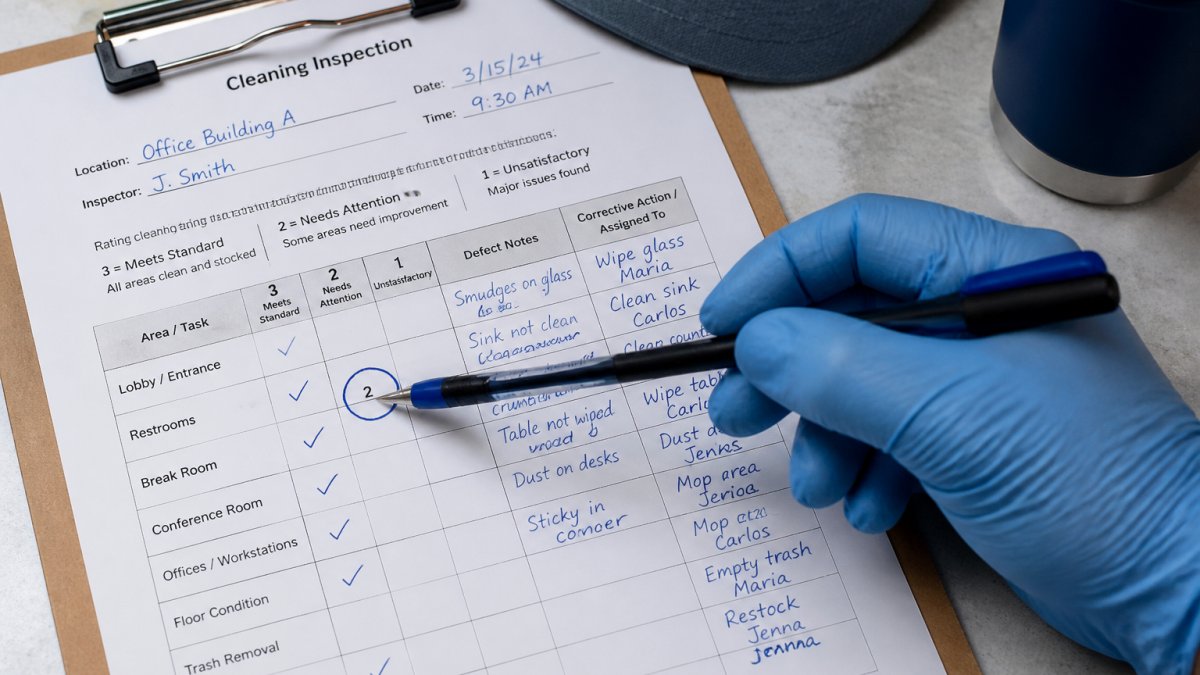
Your inspection form transforms subjective observations into measurable, repeatable data. A good template includes facility information, area-by-area task lists, a scoring mechanism, and space to document defects and corrective actions.
Essential Form Elements
A beginner-ready inspection form should include:
Essential elements include: facility and inspector information (date, time, name, location, shift); area sections organized by location; task items with a three-point rating scale (3=Acceptable, 2=Needs Attention, 1=Unacceptable); defect documentation; photo evidence field; responsible party; score calculation; corrective action assignment; and inspector signature.
Scoring Rubric for Consistency
A scoring rubric ensures every inspector grades the same task consistently. Here’s a rubric for common tasks:
High-Touch Surface Disinfection (door handles, light switches, desk surfaces)
- 3: Surface is visibly clean, no smudges or residue, disinfectant smell present or surface is dry and dust-free
- 2: Surface is mostly clean but has light smudges, minor dust, or faint residue in corners
- 1: Surface has visible dirt, fingerprints, dust buildup, or sticky residue
Floor Cleaning (vacuuming, sweeping, mopping)
- 3: Floor is free of visible debris, dust, and stains; no sticky spots; carpet pile is upright (if applicable)
- 2: Floor is mostly clean but has light dust in corners, minor stains, or slight debris in one area
- 1: Floor has visible dirt, debris, stains, or sticky spots; carpet is matted or discolored
Restroom Cleaning
- 3: Toilet, sink, and mirror are spotless; no odor; supplies are fully stocked; floor is dry and clean
- 2: Restroom is mostly clean but has light water spots on mirror, minor odor, or one supply item low
- 1: Restroom has visible stains, strong odor, empty supplies, or wet floor
Trash Removal
- 3: All receptacles are empty, liners are fresh, no debris around bins, no odor
- 2: Most receptacles are empty but one is three-quarters full, or minor debris is present
- 1: One or more receptacles are overflowing, liners are torn, or debris is scattered
Create similar rubrics for every task on your checklist and store them digitally so supervisors can reference them during inspections.
Printable and Mobile-Ready Formats
Use paper checklists for quick spot-checks and mobile apps for comprehensive walkthroughs with photo capture. Include dropdown menus for ratings, required defect notes, auto-calculated scores, timestamps, and photo attachment capability. If using a spreadsheet, add formulas for automatic score calculation. If using a mobile app, choose one that syncs to a cloud database for real-time review.
Using the Form as a Training Tool
Use your inspection form as a training document. Walk new staff through each task, showing what a “3” (acceptable) looks like versus a “2” (needs attention) using photos or demonstrations.
Keep a “before and after” photo library for each task type. Show staff what an unacceptable restroom looks like, what an acceptable one looks like, and what an excellent one looks like. Visual examples are far more effective than written descriptions.
Conducting a Commercial Cleaning Walkthrough Checklist
A commercial cleaning walkthrough checklist transforms inspection into a repeatable process. The goal is to verify that cleaning tasks meet your facility’s standards before clients or employees notice problems.
Step-by-Step Inspection Process
Step 1: Schedule Inspections Consistently, Most facilities do daily spot-checks of high-traffic areas and weekly comprehensive walkthroughs at the same time so staff knows when to expect them.
Step 2: Walk in the Same Order, Start at the entrance, move through offices, restrooms, and breakroom, ending with storage and trash removal. This prevents skipped sections.
Step 3: Verify Completion, For each task, verify completion by looking, touching, and smelling. Open trash cans, run your hand along baseboards, and check high-touch surfaces.
Step 4: Document Everything, Mark tasks complete or incomplete and note any damage or repair needs.
Step 5: Communicate Issues Immediately, If the crew is on-site, point out incomplete tasks. If they’ve left, document and escalate according to your corrective-action process.
Scoring and Documentation
Calculate your score by dividing tasks passed by total tasks inspected and multiplying by 100. Example: 48 tasks passed ÷ 50 tasks inspected = 96%. Document the score, date, and inspector name on the form and keep records in a central location to track trends over time.
Implementing a Janitorial Quality Control Checklist
Implementing a quality control checklist requires more than creating a form. You need clear standards, a scoring system, a pass/fail threshold, a corrective-action workflow, and a tracking mechanism to monitor trends. This section walks you through each step.
Setting Pass/Fail Thresholds
Set a pass/fail threshold between 85% and 95% depending on facility type: 95%+ for medical/food-service areas (safety-critical), 90% for corporate offices and retail, 85% for warehouses and manufacturing. Once set, enforce it consistently, a score below threshold triggers corrective action.
Don’t set your threshold too high. A 98% or 100% standard is demoralizing and unsustainable. Your team will burn out, and you’ll lose good staff. A realistic 90% threshold is far better than an impossible 98% threshold that no one can meet.
Corrective-Action Workflow: From Problem to Resolution
When a score falls below threshold, follow this corrective-action process:
Step 1: Document the Problem, Note exactly what failed, where, why, severity level, and include photo evidence.
Step 2: Assign Responsibility and Deadline, Critical issues (safety/health code): same day. Moderate issues (stains, restocking): 24 hours. Minor issues (dust, streaks): next shift.
Step 3: Execute the Corrective Action, Complete the fix. For systemic problems, provide retraining instead of just re-doing the task.
Step 4: Re-Inspect Within 24 Hours, Verify the problem is fixed using the same rubric.
Step 5: Document and Track, Record original inspection, failure reason, corrective action, deadline, re-inspection date, and result in a log to identify patterns.
Step 6: Escalate if Needed, If the same task fails twice in a month, address the root cause: training, staffing, unrealistic standards, equipment, or vendor performance.
Corrective-Action Tracking and Metrics
Track these key metrics: Inspection Score Trend (improving, declining, or flat), Defect Recurrence Rate (same task failing twice within two weeks indicates systemic problems), Time to Resolve (critical issues should resolve within 24 hours), and Complaint Rate (frequent complaints signal inspection gaps).
Communicating Results to Clients
Share quality assurance data with clients regularly: send a monthly scorecard showing average inspection score, number of inspections, defects found and corrected, and trends; notify clients immediately of critical issues; and provide an annual performance review showing trends, defect patterns, and improvements.
The best quality assurance system is one that’s transparent, consistent, and action-oriented. Inspect regularly, document everything, fix problems quickly, and share results with clients. That’s how you build trust and maintain high standards.
Common Mistakes to Avoid in Quality Assurance
New facilities often make predictable mistakes when building their first quality assurance checklist. Avoiding these keeps your program effective and sustainable.
Mistake 1: Creating a Checklist That’s Too Long
A 200-item checklist sounds thorough, but it’s exhausting to use. Inspectors rush through it, miss items, or skip inspections entirely.
Mistake 2: Setting Unrealistic Standards
A 100% pass rate is impossible. Dust settles. Spills happen. Supplies run out. Set a realistic threshold, usually 85-95%, and stick to it.
Mistake 3: Inspecting Inconsistently
If you inspect Monday but skip Tuesday through Friday, your data is worthless. Establish a consistent inspection schedule and follow it. Even spot-checks of key areas are better than random, sporadic inspections.
Mistake 4: Not Training Staff on Standards
Your cleaning team can’t meet standards they don’t understand. Invest time in training. Show staff what “clean” means for each task.
Mistake 5: Ignoring Corrective Actions
Documenting a problem without fixing it is pointless. If a task fails inspection, address it. If the same task fails again, dig deeper.
The best quality assurance checklist is one your team actually uses. Keep it simple, realistic, and consistent. Train your staff. Follow through on corrective actions. That’s the formula for sustainable improvement.
Building a commercial cleaning quality assurance checklist requires structure, consistency, and follow-through. Without one, facility standards drift and client satisfaction suffers. With one, you create accountability, catch problems early, and demonstrate professionalism.
The team at Guso Janitorial Services understands that quality assurance isn’t just paperwork, it’s how you ensure every facility impresses clients and supports a healthier, more productive environment for employees.
| Task Category | Frequency | Key Items | Pass Threshold |
|---|---|---|---|
| Daily Cleaning | Every shift | High-touch surfaces, trash removal, entry cleaning | 90%+ |
| Weekly Cleaning | Once per week | Dusting, floor care, window cleaning | 90%+ |
| Deep Cleaning | Monthly/quarterly | Carpet shampooing, floor stripping, appliance cleaning | 95%+ |
| Corrective Actions | As needed | Failed tasks, damage, supply issues | 100% completion |
Frequently Asked Questions
What should a commercial cleaning quality assurance checklist include?
A commercial cleaning quality assurance checklist should cover daily tasks (reception areas, restrooms, high-touch surfaces), weekly tasks (dusting, floor care), and monthly deep cleaning. Include specific areas: entryways, office spaces, breakrooms, restrooms, and trash removal. Add disinfection protocols for high-traffic zones, compliance checks for your facility type, and a scoring system to track performance consistently.
How do you score a commercial cleaning inspection?
Assign point values to each task or area based on importance. For example, restroom cleanliness might be worth 25 points, floor care 20 points, and surface disinfection 15 points. Inspect each area and deduct points for incomplete or substandard work. Set a pass threshold (typically 85-90%) and document scores. This approach creates accountability, identifies training needs, and provides data to track service consistency over time.
How often should a commercial facility be inspected for cleaning quality?
Daily visual checks by cleaning staff ensure immediate quality control. Supervisor walkthroughs should occur at least weekly, with formal inspections every two weeks for most office environments. High-traffic retail or medical facilities may need more frequent checks. Monthly deep-cleaning inspections verify that weekly and monthly tasks are completed. Adjust frequency based on facility type, foot traffic, and client requirements.
What should you do when a cleaning inspection finds a problem?
Document the issue with photos, location, and severity. Notify the cleaning supervisor or vendor immediately. Create a corrective action with a deadline (typically 24-48 hours for urgent issues). Re-inspect after the fix to confirm resolution. Track all issues and corrections in a log to identify patterns, repeated problems may signal training gaps or staffing issues. Escalate recurring failures to management for vendor or staffing changes.
How do I know if my cleaning vendor is reliable for 24/7 service?
Request references from existing clients and verify their experience with round-the-clock operations. Ask about their response protocol for no-shows or emergencies. Confirm they are fully licensed, bonded, and insured, request proof of current coverage. Start with a trial period and use a formal quality assurance checklist to document performance. A reliable vendor like Guso Janitorial Services will adapt to your facility’s unique needs.